Friday 24 November 2017

Graph API : Get all the Office 365 Groups Owned by a user

There is a Graph API endpoint to get all the Office 365 Groups a user is Member of. The filter is used to get only the Office 365 Groups.


I wanted to retrieve all the Groups that a user owns, however there is no "ownerOf" endpoint. The endpoint ownedObjects can be used to retrieve this data. 

For the current user :


For a specific user : 


However this endpoint returns all the directory objects the user is owner of.  When I tried to $filter on this endpoint, it did not work ! Through the Graph explorer it appears that at the time of writing this, $filter to this endpoint is not currently supported.  So you may just have to retrieve all the data that is returned and then filter on the "groupTypes" property of the group object in your application code.

Thursday 23 November 2017

Custom action term set navigation for SharePoint reusing the SPFx extension sample

There is a great SharePoint Framework extensions sample for navigation using the term store on GitHub . However this can only be used on the Modern pages. I tried to re-use the code of this component to build a custom action that can be used on the classic pages to provide a similar functionality.

Here is the custom action code on GitHub

  • In this, the SPFx specific code is replaced with relevant code that would run on classic pages. The extensions sample uses SPHttpClient and the Context object of SPFx. This has been replaced to use Axios NPM module to make HTTP calls. (SPTermStoreService.ts file changed)
  • The TenantGlobalNavBarApplicationCustomizer.ts has been changed to load the navigation bar when the SharePoint page loads. The SPFx extensions specific code is removed 
  • The modern pages already have react, so the SPFx components when bundled do not include react and react-dom. However, this custom action bundles react and react-dom as well in the final bundle. So there is a custom gulpfile.js with this project that uses Microsoft/gulp-core-build to compile the Typescript and SASS files 
  • The final bundle is generate using webpack through a gulp task.


More details in the GitHub documentation


Monday 30 October 2017

Work with Multi-value lookup fields in Microsoft Flow and SharePoint - Part 2

Part I of this post explains a couple of limitations of working with Microsoft Flow and SharePoint Multi-value lookup field.

Work with Multi-value lookup fields in Microsoft flow and SharePoint - Part 2

To overcome the challenge I decided to use SharePoint REST API to retrieve the field values. As you may already know, flow provides HTTP Trigger action which we can use to call the SharePoint REST API. The idea is to get an access token and retrieve the values through this HTTP trigger action. There are two great posts that helped me get an Access token, SharePoint scribblings and Shantha Kumar's blog

To start with, register an app in your SharePoint site through the "_layouts/15/AppRegNew.aspx" page. Provide the appropriate permissions so that it can access the multi-value lookup field data.

You'll have the client ID and client secret of the app. Also find out the TenantID of the tenant you are working on.

We create a new flow which is triggered when a new Item is created. Initialize the variables TenantID, ClientID, ClientSecret and a placeholder variable for AccessToken.


Next, add a HTTP trigger action, to get the access token


The body of this request is of the format

grant_type=client_credentials&client_id=<Client-ID>@<Tenant-ID>&client_secret=<Client-Secret>=&resource=00000003-0000-0ff1-ce00-000000000000/<tenantdomain>.sharepoint.com@<Tenant-ID>


Run the flow once till this step and see the history of the execution. Copy the body of the response. We will need it in the next steps.

Now we return to our flow and add a parse JSON action. Provide the "Content" as the body of the response from the previous HTTP trigger action. Use the body value copied in the previous step and paste it in the "Use sample payload to generate schema". This provides parse JSON action a sample format of the JSON that must be parsed.


Once this step executes, we are ready to use the access token. Next, use another HTTP trigger action to call SharePoint REST endpoint (here I have used a hard coded item ID) and retrieve the multi-value lookup field values. Along with the Title, you may also want to retrieve the ID of the looks. That might help you query other lists where these values may have been used.


The results show the lookup values that were selected for the item.


Now, we can then use these values as we would like to


Work with Multi-value lookup fields in Microsoft Flow and SharePoint - Part 1

I was recently working on a requirement to implement Microsoft Flow on a list that had a multi-value lookup field in it. The requirement was to fire a Flow when an item is created in the list and run a loop for each of the value selected in the multi-value lookup field.

At the time of writing this article, multi-value look-up fields are not supported in Microsoft Flow. This means that I could not straight away use the values from this multi-value look-up field and apply a loop.

If you would like to jump to how we can retrive the multi-value lookup column in Flow, here is the second part of the post

Work with Multi-value lookup fields in Microsoft flow and SharePoint - Part 2

The setup :

For this post, I am using a very simple setup, a "LookupRefList" with some 'Colours'  in it and another list "LookupUsedList" which has two fields which lookup data from "LookupRefList"

1) Colour : Single value lookup (just to show the difference in Flow values)
2) Colours : Multi-value lookup


Flow with a single-value lookup field :

We can retrieve values from a single value lookup straight away

Flow setup :


Result :


Multi Value Lookup field

When we to fetch the multi-value column in Microsoft flow, the flow runs successfully, however, when you try to see the execution log, you see an error


Click to see the log


We cannot straight away use the multi-value look-up  in a apply to each loop.


In the next part of the post, we retrieve multi-value lookup field values.

Work with Multi-value lookup fields in Microsoft flow and SharePoint - Part 2

Tuesday 10 October 2017

Re-Use your Intranet portal mega menu using SharePoint framework extensions

SharePoint Framework extensions is a great new way to customize modern SharePoint sites. The "Application Customizer" SPFx extension provides a way to customize the look and feel of certain sections of moder site such as header and footer. More details here. This gives us the opportunity to develop custom mega menu navigation and place it in the site header of modern sites .

Consider that you have a Communication Site in your tenant (for HR/Admin news etc) which is linked through the mega menu navigation of your Company's Intranet portal. Wouldn't it be great if a user navigating to this communication site was able to see the same mega menu as on the Intranet portal ? I recently implemented a solution that uses SPFx Extension application customizer to do exactly this.
  • For a customer that I was working for, the mega menu links for their Intranet portal site were stored in a custom SharePoint list.
  • A DIV element placed in their custom Master Page acted as a container for the mega menu. JavaScript code retrieved the navigation links (using REST API) from the SP list and rendered the links inside this DIV through JQuery and CSS.
  • The JS and CSS files were stored in the Style library of the portal site collection (all the users having at least read access to this library).

Reusing this in Modern sites ?

<Click on the image to enlarge>


We can re-use all the JS, JQuery, CSS files to render navigation on modern site without having to replicate these files. This can be done as :

1) Reference the JS and CSS files in the SPFx extension. The links will point to the intranet portal site's style library Here is very nice article from Chris O'Brien on how to achieve this.

2) Render the container DIV in SPFx extension through a React Element which can then be used by JQuery (or any javascript code) to render the navigation links.

Since we are using the same JS and CSS files hosted in the intranet portal site, appropriate changes will have to be made to your JavaScript code if it uses any local site's information. For instance, if it uses "_spPageContextInfo" variable to get the navigation links using REST API, the code will have to be changed to always point to your intranet portal site collection.

Implementation :

Start off by creating a Application customizer SPFx extension using Yeoman generator. Make sure you select "Do you want to allow tenant admin the choice of being able to deploy....." to YES in the yeoman generator. This will allow you to deploy the extension tenant-wide and add the navigation to the modern sites across your tenant without feature activation (Add it as a custom action).

Once the project is created, modify the code of your Application customizer typescript file to add CSS and JS references and also to render a REACT element.

Here is the code for the onInit() method of the SPFx extension. It renders a REACT element.


Create a React component in your code


Deploy the SPFx extension to your tenant's App catalog. Once it is deployed, it is globally available. You can now add the SPFx extension to a communication site easily using PnP PowerShell


ClientSideComponentId  is the ID specified in the .manifest.json file of your SPFx extension.


The exact same navigation used in your intranet portal appears on a communication site.


Monday 22 May 2017

Quick tip - Get all the empty lists and libraries from SharePoint environment using Search

There might be scenarios when you want to identify all the empty list and libraries from your SharePoint environment for general administration / governance reporting / pre-migration clean-up purposes Instead of writing long running scripts looping through the Site Collections and lists, this data can be found quickly using SharePoint search.

Out of the box, there is a crawled property and a managed property in SharePoint that indicate whether a list is empty or not

Crawled property  : ows_IsEmptyList
Managed property : IsEmptyList


By default, the managed property "IsEmptyList" is not Queryable. To be able to query for the empty list data, create a Queryable custom managed property and map the crawled property "ows_IsEmptyList". I have created a managed property called EmptyListFlag


Now using the good old Search Query Tool, I could retrieve all the empty lists in my SharePoint environment. The results will also have some Out of the box lists and libraries which can be excluded through the query or while processing the results.


PS : I have tested this only against SharePoint online only !

Monday 8 May 2017

Create a simple timer job for SharePoint online using Microsoft Flow

Creating scheduled jobs for SharePoint on-premise environment was pretty straight forward. Develop a timer job and deploy it to the farm and you are done. With SharePoint online, there are a few different ways to develop scheduled jobs, one of which is to create a Azure web job which talks to SharePoint data and runs the required tasks.

However, some organizations/small businesses do not have Azure subscription or the technical ability/developers to develop and deploy an Azure web job. Sometimes, the required functionality of the scheduled job is not too complex to create a Azure web job.

With Microsoft flow, we can easily create timer job-like features that run on a schedule and carry out a few simple tasks.I say simple because when I set out to explore several different scenarios where a Microsoft flow timer jobs can be used for a SP list, I found that Flow lacks several features. While it provides a lot of connectors, triggers, actions and conditions, as developers or power users there are a lot of actions/trigger/functionalities we need that are missing. At the end of this post I'll explain in brief about a scenario I tried to implement using Flow however it did not work out well.

Sample Timer Job

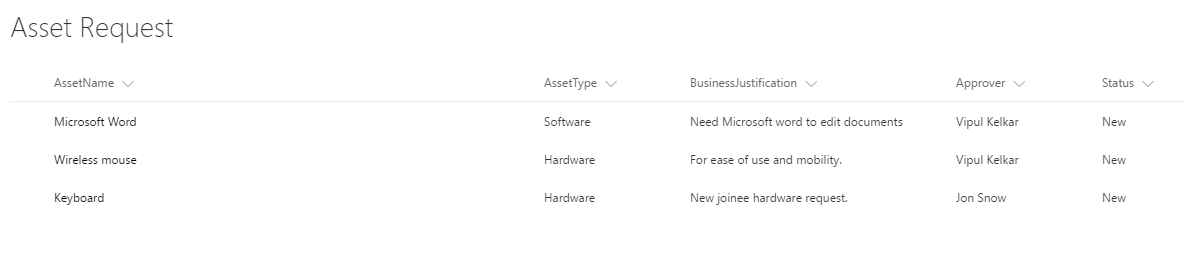
Meanwhile I decided to develop a simple timer job for asset request and procurement process. The job runs on a schedule and moves the "Approved" asset requests from requests list to a separate "Procurement" list. In this post we will see how to

1. Get items from SharePoint list
2. Filter SharePoint list items using a ODATA filter.
3. Loop on the list items
4. Create and delete list item

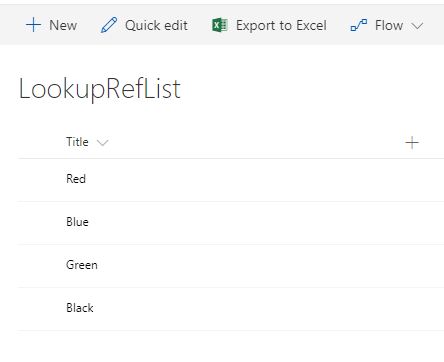
I have created two lists that will be used in this flow. Asset Request list with NEW and APPROVED requests (choice column) and a Asset Procurement list which will be empty initially.


Navigate to Flow from Office 365 and create a new flow from blank template.


Give your flow a name. The first step we add here is a Schedule action. This will enable us to define a schedule for our process to run periodically.


The schedule can be set based on Minutes/Hours/Days etc as given below


Now, we will retrieve items from Asset Request list. Add a new action and select SharePoint


Select the Get items action


Configure the Get items action. We retrieve the list items from Asset Request list and filter by only the items which are Approved


Now that we have the approved items, the next step is to iterate through the items and create these items in the Asset Procurement list. To add the Loop operation, click "Add an apply to each" action as shown below


We need to tell the loop action which data source it should iterate. Select the 'value' as indicated below. Notice the data source label is the previous action "Get items"


We need to perform two actions now,

1. Create item in Asset Procurement list
2. Delete Approved items from the Asset request list

Add an action to create a list item in SharePoint.


Select the site and list in which the items must be created and indicate the value for each column in target list. Notice that the data source from where we select the value for the item to be created is coming from our previous Get Items action. So the values coming from the Asset Request list will be added to the Asset procurement list.


Now we create a new action to delete the Approved items from the Asset request list.


We need to delete item from the Asset request list. So select the source carefully. Since we have retrieved items from the Asset request list through Get Items action, select the ID from that data source as shown below.


The complete list flow look as shown below.


After the flow execution, our lists look like :


Limitated functionalities :

The limitation or issues mentioned here are something that I noticed at the time of writing this post. As and when updates are pushed to Microsoft Flow, I will try and update this post as well :)

While creating a SharePoint list item through flow, I noticed that we cannot add values to People column and Choice column as of now. There are a couple of more types of columns which are not supported.

https://powerusers.microsoft.com/t5/Building-Flows/Create-Item-Sharepoint-list-fields-missing/td-p/8930

Also, the SharePoint get items action only accepts Odata filter and does not support the Odata Select operation.

There might be several other actions/triggers which you may need to implement your business requirement but are not yet available in Flow.

Hope this helps !!

Tuesday 18 April 2017

Evaluating Distribution list to Office 365 Groups Migration

Microsoft is encouraging customers to adopt Office 365 Groups more and more instead of using simple distribution lists. So much so that when you try to create a DL in Office 365 Exchange admin, the UI to create an Office 365 Group pops-up first :-)   ..and from there you can navigate to the UI to create a simple DL.

The distribution lists in Office 365 tenant can be migrated to Office 365 Groups. This can be done either through the Exchange admin center UI or through Powershell scripts.

Through User interface :

From the Exchange admin, select the Distribution list from Groups and click the “Migrate to Office 365 groups” button


This will upgrade the disctribution list or it will show an error if the DL is not eligible to be migrated. 

Eligibility critera :

Not all types of Distribution lists can be migrated to Office 365 Groups. Here is the documentation that explains what type of DLs are eligible and not eligible for upgrade.


Old documentation ?

At the time of writing this, the documentation in the above posted link mentions that the Moderated DLs and DLs with send on behalf setting cannot be upgraded, however I found this inconsistent. These two types of DLs CAN be upgraded and looks like the documentation is not updated (?)
I posted a query on tech community forum and from the response I gathered that the documentation will be updated soon


I will try and update this post as and when I find that the documentation on Office support site is updated.

Update [8th May 2017]: 

The documentation about the eligibility of the Distribution list for upgrade looks updated now :)

https://support.office.com/en-us/article/Upgrade-distribution-lists-to-Office-365-Groups-in-Outlook-787d7a75-e201-46f3-a242-f698162ff09f?ui=en-US&rs=en-US&ad=US#bkmk_powershell

PowerShell approach :  

Microsoft has provided Powershell scripts that evaluate the distribution lists in your tenant and provide a report of eligibilty as to whether the DLs can be migrated to Office 365 Groups or not
I decided to do an evaluation considering a couple of scenarios. From exchange online I created 6 distribution list each satisfying the below criterias

  •  DL with send on behalf setting
  •  Moderated DL
  •  Simple DL with users
  •  DL with external contacts : Mail user and mail contact
  •  Nested Parent-Child DLs


The scripts are available to be downloaded from the Microsoft documentation, You need to connect to the Exchange online in your tenant and then execute the script. On executing the Get-DlEligibilityList.ps1 two files are generated - Open the output files in excel (though these are TXT files)

Evaluation reports 

 DlEligibilityList.txt : This file lists all the DLs and whether it is eligible to be upgraded or not along with reasons and some other useful information such as

-          Owner of the DL
-          Member count
-          Reasons if the DL is not eligible.


      Again, as specified in earlier above section, the DLs with send as behalf and moderated DLs are eligible and CAN be migrated.

       MailUniversalDistributionList.txt : This file contains the properties/settings of the Distribution list and indicates whether the DL is nested in some other DL or not


What happens to the Distribution lists with external “Mail user” or “Mail Contact”

I have a added few external email IDs as Mail user and Mail contact in Exchange online. I created two Distribution lists, one having a Mail user and one having Mail contact.


When you try to upgrade a distribution list with a Mail contact, it fails with the following error as indicated by the the eligibility report.


When you try to upgrade a distribution list with a Mail user, it upgrades successfully. The external mail user is added as a member to the new Office 365 Group.


Sunday 12 March 2017

Office 365 Groups ecosystem Part 4 : External users and group email settings


Office 365 Groups ecosystem Part 1 - The Basics
Office 365 Groups ecosystem Part 2 - Office 365 Group Team site and permissions
Office 365 Groups ecosystem Part 3 - Create groups from several UI options


External users can be added as "Guests" to the Office 365 Group. Here are the details of what guests can and can't do in the group. Only users outside the organizations can be added as "Guests", users that are a part of organizations can be invited and added as regular members.


The external user receives an email and is registered in Office 365 if the user wishes to collaborate in the group.

Email settings for Office 365 Groups :

Office 365 Group email settings can be administered from the Exchange admin. Navigate to the Office 365 Admin center -> Exchange Admin and Groups


This will show you the groups in Exchange, Your Office 365 groups will also be displayed here. Double click on the group or select and click the Edit icon to change the settings of the group in detail


Can external users send emails to Office 365 groups ?


By default, the users outside your organization cannot send email to the Group mailbox. You can edit this setting from the general tab as shown.